|
I have grouped these 3 things together because I have found that most riders either think too much about them, not enough about them or use them for the wrong thing! Nose bands Nose bands often fall into the ‘not enough thought’ category. I often ask riders why they are using a particular nose band, and most of the time the reply is that it was the one the horse came with. These horses are usually in a flash nose band which has been done up quite tightly. For dressage, the noseband which I prefer to use is a cavesson, done up very loosely. This is because it allows the horse to move his mouth – the exact opposite of the purpose of a flash, drop or grackle noseband. Horses often resist in the mouth first and if you tie their jaw shut, you miss the opportunity to feel in your hands that first point of tension. Horses then become blocked in the jaw and consequently the neck and this flows through to the back and often you can hear them grinding their teeth. Loosening the nose band and paying attention to the actions of your hands it is possible, over time, to loosen off the nose band with a view to using a simple cavesson. This is something I have done with many horses, and they all respond positively to having this freedom in their jaws. But it is down to the rider to provide a correct, light contact Yes it is possible with time and patience. 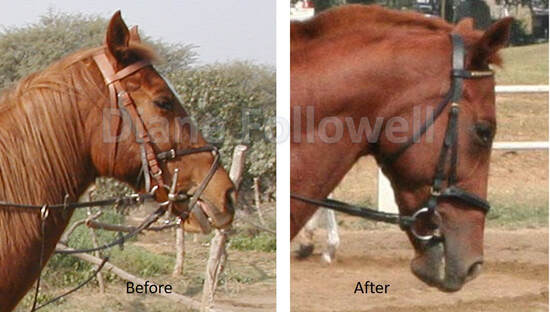 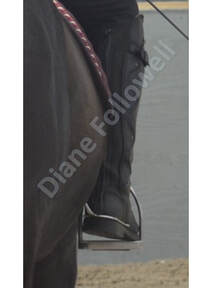 Bits Which bit to use is another problem area for most riders. Some go with the same logic as the noseband, ‘it’s what he came in’, other people spend a small fortune trying to find a bit that suits their horse. For dressage, my preference is to go with a simple snaffle, with a single joint or a small link, and rings that are either loose, egg butt or hanging cheek. This type of bit will suit most horses, but there are a few horses with difficult conformation in their jaws, such as a particularly small mouth or large tongue and for these horses finding a bit which suits them can be tricky. More severe bits tend to put horses on the forehand rather than on the haunches, and this applies to severe hands too! The time to use a double bridle is very individual, and a matter of how the horse responds to the bits; I have horses working in piaffe and flying changes in snaffles. Whichever bit you choose to use, the most important part is the hands at the other end of the reins, as they apply the pressure. Spurs The spurs are a refinement of the leg aids not, as you often see, a means to get the horse going. The type of spur you use is personal preference, and how your leg sits on your horse’s side. You should have a supple ankle, not forced down, so that you can raise the spur onto your horse’s side at the appropriate moment and then remove it again. To use the spur, apply a quick light touch, and then immediately remove it from your horse’s side. It is the lightest, softest touch you can give, so you do less. Touch on the side of the hind leg you want to draw under more. You should be able to feel exactly when the spur touches the hairs on the horse’s side and apply the spur with the utmost delicacy. Over many years of dealing with horses I have seen how differently they respond to each rider, from the ex-racehorse who became a complete plod when a disabled rider hacked him out, to the school pony who changed from finding ever new and inventive ways of disrupting lessons into a pony who waited patiently for a disabled child to mount, carefully moving off and slowing down if the rider lost balance. Horses don’t know or care who you are, all they know is how you ride, they are very quick a summing people up, and it is an aspect of riding that is often neglected. As part of my interest in this area of training horses, I recently had the opportunity to attended a taster session run by a company called Lead Change and HorseHeard who use horses to develop leadership and team building skills and for personal development of key emotional and social intelligence skills. It proved to be a fascinating morning, we started with introductions and a brief chat about what people wanted to get out of the session. There was an interesting mix of people from quite diverse areas, one of the group had never been in contact with horses before. Following the safety chat, we went to the quiet atmosphere of the school and spilt into 2 groups. It was revealing to see how each of the 2 horses behaved with the attendees, from not moving at all to walking off in the opposite direction. Ultimately everyone did manage to find a quiet way of communicating with their horse without force, which was appropriate for the horse and the horse accepted. So next time you horse refuses to do something, perhaps think about how you are asking and see if there is something you can change to find a way that will enable you to communicate with your horse in a way he better understands. © Training Riders, Transforming Horses
|
AuthorDiane Followell Classical Dressage Trainer 
|
 RSS Feed
Telephone+44 (0)7931551014
|
info@dianefollowell.com
|
© Diane Followell 2015 -2024.
All Rights Reserved.
All images and content are copyright Diane Followell unless otherwise stated.
All Rights Reserved.
All images and content are copyright Diane Followell unless otherwise stated.